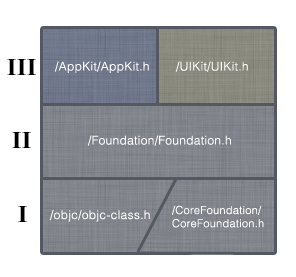
basics of iOS and OS X API’s


The structure of OS X and iOS native* API’s is very straight forward/minimalistic, typically one does not need to know about anything that goes below the Foundation API however taking a look at the headers can help understanding it better and clearing common confusions between Foundation and CoreFoundation or what exactly constitutes CocoaTouch and Cocoa since the later is a explicit framework while the former is just a naming convention.

All the API’s are present as binary frameworks under /System/Library/Frameworks (with resources but without headers) and under your Xcode toolchain SDK (with headers but without resources) , the objc binary is at /usr/lib/libobjc.A.dylib while the headers are under /usr/include/objc/ and your Xcode toolchain.

I
Now let’s dig right into it, at the lowest level there is CoreFoundation and objc, they are independent of each other :

<objc/objc.h>
objc_class,objc_object,objc_selector etc

<objc/runtime.h>
objc_getClass,objc_getProtocol,class_conformsToProtocol etc

<objc/message.h>
super_class,objc_super,objc_msgSend,objc_msgSendSuper etc

(you can include all the above with #import <objc/objc-class.h>)

<CoreFoundation/CoreFoundation.h>
CFString,CFNumber,CFArray,CFRunLoop,CFStream etc (this is just C, there is no Objective-C syntax or anything at this level)

II
On top of these and including (relying on both) is Foundation, as the name implies you typically never use any API’s below foundation directly.

<Foundation/Foundation.h>
NSString,NSNumber,NSArray,NSRunLoop,NSStream etc, much of it is toll-free bridged to CoreFoundation

III
on top of Foundation there is AppKit for OS X or UIKit for iOS
(on OS X you typically include Foundation, AppKit and CoreData with #import <Cocoa/Cocoa.h>, there is no corresponding CocoaTouch shell framework on iOS)

<AppKit/AppKit.h>
NSView,NSButton,NSColor,NSEvent etc

<UIKit/UIKit.h>
UIView,UIButton,UIColor,UIEvent etc

This is pretty much all there is, from this on there are multiple optional frameworks you can use for specific cases, but the basics are just in the headers above, most API’s are Cocoa but there is still a big chunk of C API’s especially on the OS X side.

It’s worth nothing that there are two types of frameworks : private and public , the private ones are not safe to be used and not allowed in the Mac App Store , the public ones are safe to be used as long as they have headers in the SDK (they could be present in /System/Library/Frameworks but not in the SDK) typically such disparity is a rare occasion nowadays and it was more common prior to 10.6.

One more note is that public frameworks with headers might not have all their methods/classes documented, nevertheless using them should be pretty safe but the lack of documentation is a indication that they are more likely to change/go away than the documented ones.

*OS X and IOS also have the low level BSD API’s (found in /usr/include) most of which are cross-platform and outside the scope of this post.

extended attributes, spotlight and xcode screenshots

If you shall find yourself wondering, as i did, how exactly does Xcode know which device too what screenshot from the ones it manages the answer is simple, it just saves extended attributes for the files with the device id under com.apple.DTDeviceKit.screenshot.device_id e.g.

[valexa@VAiMac:~] $ xattr -l /Volumes/Storage/Screenshots/Screenshot 2010.07.13 01.43.57.png
com.apple.DTDeviceKit.screenshot.device_id: 5a14571ebe34512345b7345e13454a

Finder being finder has no way whatsoever to display or search for extended attributes, however some useful spotlight metadata is saved (the spotlight metadata itself used to be saved as extended com.apple.metadata attributes and xattr is still the only way to edit it) :

[valexa@VAiMac:~] $ mdls /Volumes/Storage/Screenshots/Screenshot 2010.07.13 01.43.57.png
….
kMDItemPixelHeight = 1024
kMDItemPixelWidth = 768
….

This can in fact be searched with finder even if not readily apparent, you have to add a specific Raw Query for it to understand the raw commands that you would have given to mdfind e.g.:

[valexa@VAiMac:~] $ mdfind -onlyin /Volumes/Backup kMDItemIsScreenCapture == 1
/Volumes/Backup/10.8/Screen Shot 2012-03-03 at 12.00.30 AM.png

This searches for screenshots taken from your mac (you can search for specific types for example whole screen ones with kMDItemScreenCaptureType == “display”, screenshots taken of specific windows with kMDItemScreenCaptureType == “window” or “selection” etc)

I had to do this because my screenshots folder contains both the Xcode ones and my mac screenshots, my specific goal was to figure out why some iOS screenshots there no longer showed under their corresponding devices, it turns out that i edited some with Photoshop and it replaced the extended attributes.

Editing those attributes with finder and AppleScript while possible is extremely convulted and employs shell calls anyway so we just head back to Terminal with the newfound knowledge of what screenshots we have.

Now if you only have one device for each screen resolutions available in iOS you are in luck, to print the extended attributes for iPhone, iPhone Retina, iPad, iPad Retina respectively, you can do:

mdfind -onlyin /Volumes/Storage/Screenshots/ “kMDItemPixelWidth == 480 || kMDItemPixelHeight == 480” -0 | xargs -0 xattr -l
mdfind -onlyin /Volumes/Storage/Screenshots/ “kMDItemPixelWidth == 960 || kMDItemPixelHeight == 960” -0 | xargs -0 xattr -l
mdfind -onlyin /Volumes/Storage/Screenshots/ “kMDItemPixelWidth == 768 || kMDItemPixelHeight == 768” -0 | xargs -0 xattr -l
mdfind -onlyin /Volumes/Storage/Screenshots/ “kMDItemPixelWidth == 1536 || kMDItemPixelHeight == 1536” -0 | xargs -0 xattr -l

Now that you seen your device id’s of the screenshots with proper attributes you can go ahead an set the proper id for all screenshots for a screen type e.g.:

mdfind -onlyin /Volumes/Storage/Screenshots/ “kMDItemPixelWidth == 480 || kMDItemPixelHeight == 480” -0 | xargs -0 xattr -w com.apple.DTDeviceKit.screenshot.device_id ‘5a14571ebe34512345b7345e13454a’

Xcode will immediately catch on the change and credit the screenshot properly for it’s source device.

refresher on resource forks

Resource forks are a strange beast, while Apple started moving away from them (around 10.4) and migrated to HFS Attributes, software like Adobe’s Photoshop still save (can be disabled in Preferences > File Handling) file previews as resource forks, here is a refresher on how to view, find and delete resource forks.

You can see is a file has a resource fork in a number of ways (they all involve the terminal)

1- see if the file has a “com.apple.ResourceFork” extended attribute

xattr /Volumes/Volumename/Dirname/filename.extension

2- lookup the attributes of the resource fork directly

ls -l@ /Volumes/Volumename/Dirname/filename.extension

ls -ila /Volumes/Volumename/Dirname/filename.extension/..namedfork/rsrc

File system operations can be performed on a resource fork just like any other file so you can copy or delete them, to get a path to the resource fork you add /..namedfork/rsrc to the full path of the file in question, for example to copy then remove the fork:

cp /Volumes/Volumename/Dirname/filename.extension/..namedfork/rsrc ~/Desktop/thefork.rsrc

rm /Volumes/Volumename/Dirname/filename.extension/..namedfork/rsrc

You can also delete the fork by removing the extended attribute

xattr -d com.apple.ResourceFork /Volumes/Volumename/Dirname/filename.extension

Or print a hex dump of the actual data in the fork

xattr -l com.apple.ResourceFork /Volumes/Volumename/Dirname/filename.extension

You can find all the files that have resource forks with this terminal command :

find / -type f -exec test -s {}/..namedfork/rsrc ; -print

Now if you were to combine the last two you could delete all resource forks (in a given type of files under a certain path) e.g.:

find /Volumes/Volumename/Dirname -type f -name “*.extension” -exec test -s {}/..namedfork/rsrc ; -print0 | xargs -0 xattr -d com.apple.ResourceFork


NOTES:
Messing around with/deleting resource forks should be pretty safe nowadays, they were the mechanism used in Snow Leopard for storing HFS compressed files but this has been removed altogether in Lion.

The actual file as we know it is referred to as the data fork in this context and there used to be a way to get to it with /..namedfork/data but that does not appear to work anymore, if anyone can clarify please comment.

If you want to really dig into the gory details of your filesystem or maybe are in the unfortunate predicament of having to recover lost data i strongly recommend fileXray by Amit Singh, writer of the Mac OS X Internals book.

Sandboxing woes

It’s a brave new sandboxing world they say and that brings about many implications good and bad, to a security professional asking the user for permission to read every single file might be pure heaven, to a UX professional it might be hell.

Either way consider this scenario, you have a application that needs to know some operating system setting, some configuration context, Apple can never provide exhaustive API’s for all scenarios and you will inevitably have to read or write to files the user does not directly need to interact with.

Before sandboxing you could just do this transparently, this is all good unless a attacker takes over your application and leverages it to wreak havoc, that is what sandboxing prevents but it also prevents legitimate scenarios and until Apple adds a way to specify in the entitlements a list of files that the application transparently needs to access the only way is to ask the user explicit permission.

Here is a way :

-(void)punchHoleInSandboxForFile:(NSString*)file
{
    //only needed if we are in 10.7
    if (floor(NSAppKitVersionNumber) < = 1038) return;
    //only needed if we do not allready have permisions to the file
    if ([[NSFileManager defaultManager] isReadableFileAtPath:file] == YES) return;
    //make sure we have a expanded path
    file = [file stringByResolvingSymlinksInPath];
    NSString *message = [NSString stringWithFormat:@"Sandbox requires user permision to read %@",[file lastPathComponent]];

    NSOpenPanel *openDlg = [NSOpenPanel openPanel];
    [openDlg setPrompt:@"Allow in Sandbox"];
    [openDlg setTitle:message];
    [openDlg setShowsHiddenFiles:NO];
    [openDlg setTreatsFilePackagesAsDirectories:YES];
    [openDlg setDirectoryURL:[NSURL URLWithString:file]];
	[openDlg setCanChooseFiles:YES];
	[openDlg setCanChooseDirectories:NO];
	[openDlg setAllowsMultipleSelection:NO];
	if ([openDlg runModal] == NSOKButton){
        NSURL *selection = [[openDlg URLs] objectAtIndex:0];
        if ([[[selection path] stringByResolvingSymlinksInPath] isEqualToString:file]) {
            return;
        }else{
            [[NSAlert alertWithMessageText:@"Wrong file was selected." defaultButton:@"Try Again" alternateButton:nil otherButton:nil informativeTextWithFormat:message] runModal];
            [self punchHoleInSandboxForFile:file];
        }
	}else{
        [[NSAlert alertWithMessageText:@"Was denied access to required files." defaultButton:@"Carry On" alternateButton:nil otherButton:nil informativeTextWithFormat:@"This software can not provide it's full functionality without access to certain files."] runModal];
    }
}

You need to add a call to punchHoleInSandboxForFile before every file access call eg:

[self punchHoleInSandboxForFile:@"/etc/hostconfig"];
NSString *stuff = [[NSString alloc] initWithContentsOfFile:@"/etc/hostconfig"];

This nags the user once for each file, once the hole has been punched for that file it persists for the lifetime of the process, it presents a file dialog with the file in question already selected (however that does not seem to be consistent, sometimes selecting the file will be required) .

Here’s hoping Apple adds something along the lines of setting specific files with permissions in the entitlements sooner than later, until then feel free to use this and suggest any better alternatives you can find.


discrete graphics and you

In 2010 Apple introduced a feature in MacBooks with the aim of extending battery life “Automatic graphics switching” that switches between using either the integrated Intel GPU  inside the CPU or the standalone discrete AMD/Nvidia GPU.

The exact conditions however that make it switch one or the other were never clearly stated by Apple, and there has been much debate confusion and speculation on the subject.

Upon testing i found the answer to be pretty straight forward in that if a application ever loads the OpenGL.framework the machine switches to the standalone GPU (easiest way to determine this is inspect the files area of the program with Activity Monitor and look for OpenGL.framework) ,i have so far unable to find any other framework besides it to trigger the switch.

Determining what can make it load that framework is not that straight forward however, and remember it does not have to be linked for it to be loaded, any API that relies on it can trigger it’s loading, and the likely culprit in most cases will be Core Animation which uses OpenGL backing.

So to make sure you do not trigger the standalone GPU you need to make sure your code does not rely on any Core Animation API’s or any that otherwise uses OpenGL, also remember that all the “Effects” in Interface Builder require a Core Animation layer that will trigger the loading of the OpenGL.framework

EDIT: As of lion there is a property you can control this behavior with, the NSSupportsAutomaticGraphicsSwitching key as detailed in the Allowing OpenGL applications to utilize the integrated GPU QA


what the sparkle doc’s won’t tell you

Sparkle is the updates framework for cocoa that “just works” , yea ok it does , however the documentation for it is a bit lacking on some very important aspects that i discovered over time :

1 – the preferences for your application must have SUAutomaticallyUpdate TRUE for autoupdates to happen , just setting SUEnableAutomaticChecks TRUE in the app’s Info.plist is not enough ,

NSUserDefaults *defaults = [NSUserDefaults standardUserDefaults];

[defaults setBool:YES forKey:@”SUAutomaticallyUpdate”];

[defaults synchronize];

OR

SUUpdater *updater = [SUUpdater updaterForBundle:[NSBundle mainBundle]];

[updater setAutomaticallyChecksForUpdates:YES];

OR

create a checkbox in the preferences of your app to toggle it on , unless you do that you have to use one of the methods above directly in code.

2 – since 1.0 sparkle implemented sparkle:shortVersionString to match CFBundleShortVersionString , the problem however is that it is only used when it also sees a different version in sparkle:version , for example if your app has

CFBundleVersion 1
CFBundleShortVersionString 1.1

and the appcast has
sparkle:version=”1″
sparkle:shortVersionString=”1.2″
sparkle will say you have the latest version , it only uses shortVersionString if  version differs from CFBundleVersion

3 – some times you might also want to force a update , either when the user clicks a Update Now button or when the application launches

SUUpdater *updater = [SUUpdater updaterForBundle:[NSBundle mainBundle]];

[updater checkForUpdates:nil];

OR

[updater setAutomaticallyDownloadsUpdates:NO];

[updater checkForUpdatesInBackground];


Both check for a update , however the first way also notifies the user if the current version is the latest one , so should only be triggered from a user action.

The second can be ran transparently on startup as it will not alert the user unless there is a new update , remember to set automaticallydownloadupdates off , or else the updates will only get downloaded and never installed (bug in Sparkle 1.5 b6)

EDIT: the bug has been confirmed for 1.5 b6 by Andy Matuschak , it is fixed in the github sources however http://github.com/andymatuschak/Sparkle/

apple “magic” mouse testing

Personally i think a gesture enabled mouse is a great move, and am looking forward to seeing it implemented in more mice, besides the mighty mouse i have been using a Logitech Air mouse which has a touch scroll with momentum which i miss dearly when using the mighty mouse, i am sure the same will be true about gestures.

I am also a low profile mice guy, since the A4Tech OP620 i have been sold to the precision and handling mode of mice that do not look like you are supposed to rest your whole hand on, i am delighted that Apple also went this way tho i recognize that maybe in the future mice should come with 2 options (a raised or a low profile version) to suit everyone but Apple’s way is not about giving the user choice but taking that decision for them so i do not expect them to do this.

Additionally while not immediately apparent touch mice have totally different handling dynamics than legacy non touch mice, they are more similar in that respect to touchpads so it should come as no surprise that the low profile shape is the fitting one as opposed to the legacy mice’s breast shape that conflicts with the way touch devices are interacted with (roughly that the touches have meaning so they are non continuously applied)

I do have some issues with the magic mouse, when it was announced i was hoping a old issue with the apple mice might have been addressed, that is the inability to hold down both buttons, the mouse registers a left click when a user clicks with both the right and the left fingers pressing.

While the swipe functionality alleviates this a bit there are still a number of 3d applications, games, and browsers that need the old “poorman’s swipe” AKA Mouse chording a left swipe being similar to pressing and holding the right button then pressing the left and vice-versa, but this way of clicking can not be entirely replaced by the swipe feature as you can not swipe and drag for example.

What i do hope is that software developers will start to be aware of gesture enabled mice and of mice lacking 2button hold functionality, or even better mice manufacturers start making mice that implement both features, in any event here is a osx application i wrote for the purpose of testing mouse functionality.


clicktest

midnight commander for snow leopard

midnight commander snow leopard

Wether you like to have a file manager running as root , need a file manager that can really dig into the guts of the os or are just nostalgic for the good ole 2 pane commanders , either way you got to have mc handy on your brand new 64 bit osx.

There are a number of ways to install it , you can go all out downloading the source and dependences and compile , or take a easy road by means of the macports or fink  packages , however there you might find this way the easiest .

Attached to this post is a zip file with the compiled sources, download and extract it to the root directory of /mc , then open a terminal with 5 tabs , type “cd” in each then drag each of the folders to a different tab , press enter in each , then type “sudo make install” in each tab , in this order : gettext > pkgconfig > glib > slang > mc.

That’s all there is to it, delete /mc, now type mc to get your native 64bit mc fix.mcsl

having fun on the network

Itunes has a shared library feature but does not show you who and what is it sharing to.So lets start terminal and type :

lsof |grep iTunes |grep TCP

You can also find out what they are listening to by doing

lsof | grep mp3

Now how about for a little fun , say your colleague is listening from a windows machine

nmblookup -A 192.168.0.23

gives you their netbios name , next on use that name with :

echo “Ejoying songname John ?” | smbclient -M THENAMEHERE

shows a dialog like this smack middle in their windows screen
alert
Note that you can send messages like this to any computer you see in finder’s SHARED sidebar , just don’t abuse it , it will stop being funny.

setting up osx as web server

By default OSX comes with the industry standard apache web server , only OSX server comes with a mysql server however and none are configured my default for php.

Fortunately enabling both php and installing mysql is trivial on OSX compared even to linux
1 – enable php in apache (basically edit the config file uncommenting php module)
HOWTO :
type in terminal

sudo pico /etc/apache2/httpd.conf

press the down arrow untill you see this line

#LoadModule php5_module libexec/apache2/libphp5.so

delete the “#” at the start of the line by pressing right arrow and delete
press ctrl+x
press y
press enter
(you need to use console to edit this file because osx has no way to access that file in a open file window from any program)
2- install mysql
HOWTO:
go and download the package for your architecture and osx version , install it and the pref pane
open System Preferences and click MySQL > Start MySQL Server
open terminal and type :

/usr/local/mysql/bin/mysqladmin -u root password “MYPASS”

/usr/local/mysql/bin/mysqladmin -u root -h MYHOSTNAME password “MYPASS”

change MYPASS to what you want your mysql password to be and MYHOSTNAME to the machine’s hostname (it is shown in terminal along with your user name like this [myuser@myhostname:~])
3 – done , you are the owner of a AMP (apache/mysql/php) server , now you can harness the huge amount of free web software running on this ,
as a test that everything worked fine you can install phpMyAdmin as you will probably need it anyway , go to http://www.phpmyadmin.net and extract it to /Library/WebServer/Documents/phpmyadmin
open /Library/WebServer/Documents/phpmyadmin/config.default.inc.php in a text editor
find

$cfg[‘Servers’][$i][‘host’] = ‘localhost’;

and replace localhost with your hostname

save the file as /Library/WebServer/Documents/phpmyadmin/config.inc.php
done , open http://myhostname/phpmyadmin and login with user: root , password:what you set before